The Kindle Fire HD offers much hardware for little money. Are you tired of the Amazon surface, is available thanks to CyanogenMod 11 also includes a current Android version available.
If you are a Kindle Fire HD are owned, but this will not continue with the To use preinstalled surface and the restricted supply from the Amazon App Store, there is an alternative. In this article you will learn how to get CyanogenMod using the current version of Android and consequently more functions to your tablet.
Requirements and preparations for the upgrade
is a prerequisite for the following description of a Kindle Fire HD 7 of the first generation from the year 2012. The employed firmware only works with this. When you try to install the firmware on another Kindle Fire HD, the device no longer works after that. The Kindle Fire HD 7 of the first generation is indicated by the built-in camera on the front. This has Amazon omitted from the second generation of devices
This article comes from the special issue of PC World Hacks – Raspberry Pi & amp. Arduino

Before you start the action, some preparations are necessary. Check First, make sure your Kindle Fire HD is recognized correctly under Windows. Connect it to a USB cable to your computer. The device appears in Device Manager under Windows as a “Portable Device”. If you have not enabled on your Kindle Fire ADB (Android Debug Bridge), delete the driver in the Windows Device Manager via the context menu item “Uninstall”. Disconnect the USB cable from your computer dan again.
Select Next in the security settings of the Kindle Fire, the ADB settings in the device settings. Allow additional installation of applications from unknown sources. This switch is situated right in the Applications- menu. Connect your Kindle Fire again to your computer. Windows recognizes the device again and install the appropriate driver. For the following actions, you also need ADB driver and fastboot tools. This will get you automatically when you download the Android SDK from Google’s developer site. With approximately 350 MB is a very large download. But there are also thinner drivers collections. For example, the 15 Seconds ADB Installer on XDA-Developers, which is just over nine MB and contains everything you need.
© Amazon
Kindle Fire HD rooten
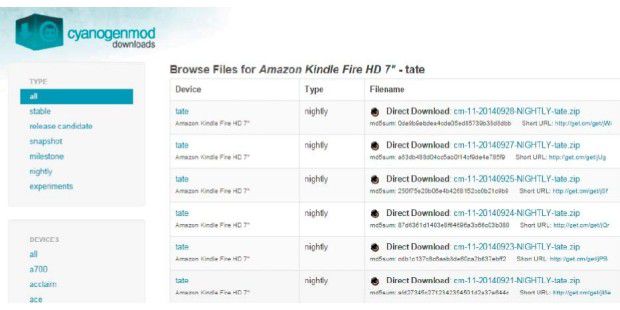
The basic prerequisite for the successful transition to CyanogenMod 11 is a gerootetes Kindle Fire HD. This can be accomplished by now without much manual effort across different tools. We have chosen for Kindle Fire First Aide (KFFA). Download the tool package via XDA-Developers. The download links are behind “Root Step 1: Download Kindle Fire First Aide:”. There is a 32- and a 64-bit version
Very important for the following actions is activated ADB switch in the security settings on your Kindle Fire, as the following steps will not work otherwise. Also, check whether you have a current version of “Java SE Development Kit”, and update it if necessary. Unzip Kindle Fire First Aide in the directory “C: KFFirstAide”. Do not change the name of the path, as some KFFA tools search files in the same path. Go to the directory “C: KFFirstAide”, and place a link to “runme.bat” from the context menu “Send to Desktop (create Verknüpung)” on. Then call the properties of the shortcut and change the first name on the “General” tab. Then put on the “Shortcut” tab and the “Advanced” button “Run as administrator” option.
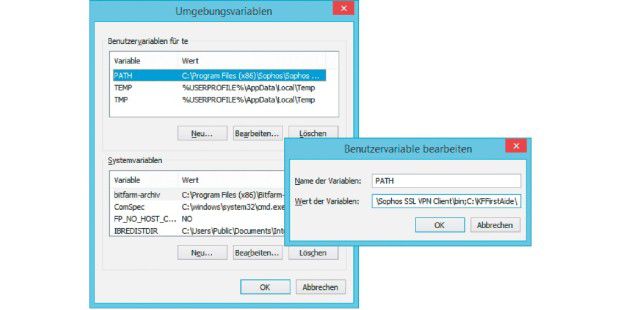
For the correct execution of the program collection, you specify the path in addition to the Windows environment variables. To do this go to the Control Panel, click “System” and click on “Advanced System Settings”. Go to the “Advanced” tab, and click the “Environment Variables”. In the upper part of the window you will find the “Path” variable. Edit it and add at the end of the value “C: KFFirstAide ” link. Use as a separator to the previous entry with a semicolon. Then turn on your Kindle Fire HD and connect it via USB to your computer. Start “runme.bat” and select “Root the Kindle Fire -method 1″. Should your Kindle Fire HD not work as expected, try the second method “The Root Kindle Fire – Method 2″. Then you have a rooted Kindle Fire HD.
If you have problems or questions to Kindle Fire First Aide to take a look at the forums of XDA-Developers.
Backing up system and personal data
Before you start installing CyanogenMod 11 (CM11), perform a data backup. To do this create a folder on your computer – in the example “C: Backup Kindle Fire”. For backup, use the “adb” command at a command prompt, type
Open on WIN + R and cmd a command prompt and run the following commands (four lines).
adb shell su -c "dd if = / dev / block / mmcblk0boot0 of = / sdcard / boot0block.img" adb shell su -c "dd if = / dev / block / platform / omap / omap_hs MMC.1 / by-name / boot of = / sdcard / stock-boot.img "adb shell su -c" dd if = / dev / block / platform / omap / omap_hs MMC.1 / by-name / recovery of = / sdcard / stock-recovery.img "adb shell su -c" dd if = / dev / block / platform / omap / omap_hs MMC.1 / by-name / system of = / sdcard / stock-system.img " To create a backup of the internal memory in the” / sdcard “on the tablet. The execution of the last command line can take several minutes.

Then copy the data created with the following four command line on your computer. If you have created an alternate directory for the backup files, adjust the numbers simply accordingly.
adb pull / sdcard / boot0block. img "C: Backup Kindle Fire" adb pull /sdcard/stock-boot.img "C: Backup Kindle Fire" adb pull /sdcard/stock-recovery.img "C: Backup Kindle Fire" adb pull /sdcard/stock-system.img " C: Kindle Fire Backup " Second bootloader and TWRP install
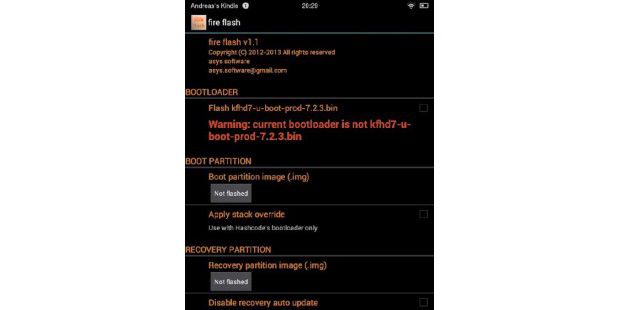
To install CM11 you need an alternate boot loader and TWRPRecovery. The two files are available here. The easiest way to perform the installation of the boot loader through the app Fireflash. Download the APK from the forum post at XDA-Developers down.
Then check again the setting of the installation of apps from unknown sources. Let this be, and then run the downloaded APK file. Link then the two files for TWRP and the alternate boot loader on the surface of “Fire Flash” via the “Not flashed.”
In the “boot partition” add the IMG file “kfhd7 -freedom-boot-7.4.6.img “added,” Recovery Partition “in accordance with the second. Additionally, activate the option “Flash kfhd7 …” “Boot Loader”, “Apply stack override” “Boot Partition” and “Disable recovery autoupdate” “Recovery partition”. Then run the flash process using the “flash install script” by.
CyanogenMod 11 install
Finally, you need to shut them directly on the CyanogenMod site the latest version of CyanogenMod 11. Load. Then close the Kindle Fire HD again via USB cable to your computer and copy the image file on your tablet.
Download also equal to the Google Apps downloaded. This can also be found on the CyanogenMod site. Unpack the ZIP file in the same directory as the CM11 image. The easiest way to get into recovery mode when you select the app “Fire Flash” function “reboot into recovery”. In this case, the Kindle Fire is automatically restarted in recovery mode.
Show TWRP under the following successive steps:.
- Go gt in the “Wipe & menu; Advanced Wipe “.
- Select the options” Dalvik “,” System “,” Data “and” cache “, and perform the action via” Swipe to Wipe “from.
- Return to the main menu, and select the “Install”.
- Navigate to the directory where you have the CM11 image stored and select “Swipe to confirm flash” from.
- The flash takes about one minute. Insert the end the “Wipe Cache & gt; Dalvik “, and then restart your Tablet using the” Reboot “.
Then start again the second bootloader TWRP by hold it at boot time “Louder” button for about three seconds. The Kindle Fire logo changes from orange to blue, and TWRP is called again. Select again the “Install” function and install during this process the Google Apps. Run after this action again “Wipe Cache & gt; Dalvik “and reboot the device. On the next start is set CM11 welcome, and you can begin configuring your new operating system.
Getting Started with CyanogenMod
If you Google Apps package installed, you can download the desired applications directly from the Google Play Store. All you need is a Google account. This can create, if necessary, with the first call of Play.
There are constantly new images of CM11 for the Kindle Fire, is worth looking for regular updates, because they usually bring more features and stability. Check gt “Settings &; About tablet & gt; CyanogenMod updates “if a new version is available and install them if necessary.
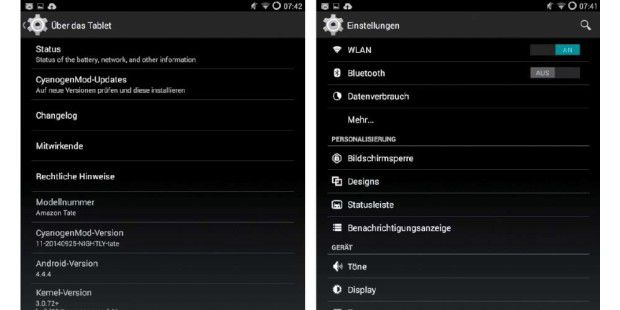
The CyanogenMod-pezifischen configuration options are also housed within the settings. There is, for example, the item “Profile”, behind which hides a list of different basic settings for the terminal. This gives you the opportunity to choose your own settings, for example, in the car, at night or at work. You set the individual values for WLAN or Bluetooth and set the volume for individual apps. You determine App features, and other system settings and adapt them to the given framework conditions
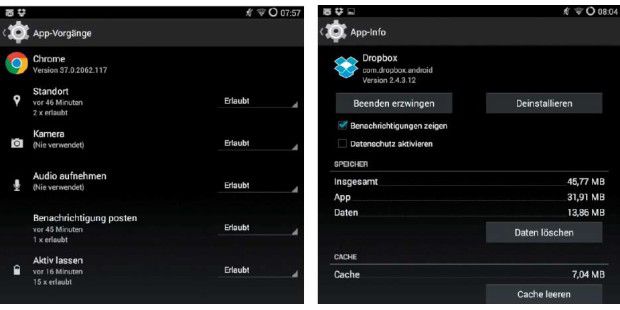
Notice for apps. Another particularly interesting feature is located under the heading “Privacy”, and also named “Privacy”. With this you directly manage the individual access rights of apps. In the basic delivery of the protection is disabled. Set for use as a first check “Enable default”. Subsequently, it is possible for your already installed apps to check the permissions granted individually and change it if necessary.
Click an application longer in the list to switch to the detail view. In this you can see all the requested and approved rights of the app. These can be of “Permitted” in the values of “Denied” or “Always ask” change. If you are not sure which is the significant value, you should always make only one change and grope in this way an optimal configuration without endangering the stability of the application.
talkativeness volume. Let Notifications of apps be centrally managed at a location within the CM11. You will find the settings within the “Privacy” “to filter notifications” on. Select the configuration from the “Notifications” in the upper right corner. You then see a list of messages that have been displayed. When you tap an entry from the list twice, you come to the view “app-info”. At this point, you enable the option “Activate Privacy” if you do not want to see the messages that your CM11 installation also communicates regularly with the CM server and provides this anonymous device statistics. These require the developer to improve the image. If you wish to disable the communication, disable the transmission also about the privacy menu. Customize appearance: The settings for the CM11 interface, refer to the settings of “personalization”. This includes a total of four sections. Within the menu “screen lock” to specify which elements are displayed on the first screen. These are the time and date as well as the battery status during charging standard. In the settings under “Widgets” They have the ability to display further customize and add new features. In the designs you will find various design packages that allow you to customize the appearance. If you do not like just individual settings in the standard, they can also be customizable, customize, for example, a new background. In the “Status Bar” can be found in standard time and battery strength as a circle. It also offers you CM11 also the battery level in percentage or brightness control. This add in the status bar when needed. Restore
Factory Settings
Do you want to return the Amazon Kindle Fire HD version on the use ? In this case, there are different ways to restore the original state. The most reliable method works with a factory cable. Tinker either yourself or order it over the Internet. A construction manual can be found for example in the forum of Android Help. Ready cables are available on eBay for prices 10-15 euros.
In addition to the factory cable, you also need toolkit Kindle Fire HD System.img Restore tool. This is accessed from the factory cable into the fastboot mode and then put either the original version or a version remo restored.
![]()
No comments:
Post a Comment